Recording live TV with IPTV recording lets you save your favorite shows, movies, and sports events to watch later. While IPTV is primarily a live streaming technology, many player apps now support recording features that work similarly to a DVR. This guide covers everything from in-app recording to network-based solutions.
Can You Record IPTV?
Yes, you can record IPTV streams, but the method depends on your player app, device, and IPTV provider. Some apps like TiviMate have built-in recording, while others require external tools. Recording an IPTV stream is not as straightforward as pressing record on a cable DVR, but modern apps have made it much easier.
What You Need to Record IPTV
- An IPTV player app that supports recording (TiviMate, IPTV Smarters Pro, Kodi)
- Sufficient storage space on your device or network drive
- A stable internet connection for uninterrupted recording
- An IPTV provider that allows recording (most do)
- A device with enough processing power to stream and record simultaneously
Recording with TiviMate
TiviMate is the best option for recording IPTV on Android TV and Fire Stick. Its premium version offers reliable recording features.
Setting Up Recording in TiviMate
- Open TiviMate and go to Settings > Recording
- Set a Recording folder — use internal storage or a USB drive
- Choose recording format (TS or MKV recommended)
- Set maximum recording duration if desired
- Enable Record series for automatic recording of recurring shows
Recording Live TV in TiviMate
- While watching a channel, press the OK or Select button on your remote
- Click the Record icon (red circle)
- Choose the recording duration or select Record until stop
- The recording begins immediately — a red indicator appears
- To stop, press the record icon again
Scheduling Future Recordings
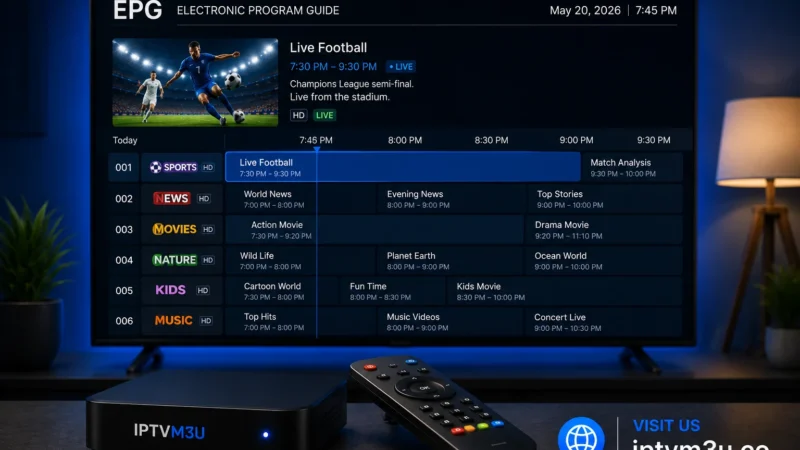
- Open the EPG guide
- Navigate to a future program
- Long-press the OK button
- Select Record from the menu
- The program will record automatically when it airs
- Open IPTV Smarters Pro and go to Settings > Recording
- Enable Recording feature
- Set your storage path
- While watching a channel, click the Record button in the playback controls
- Select duration and confirm
- In PVR IPTV Simple Client settings, enable Recording
- Set a Recording path to a local or network folder
- Open the TV section and navigate to the channel you want to record
- Select Record from the context menu
- For scheduled recordings, use the EPG guide and select Record on future programs
- SD channel: ~1 GB per hour
- HD channel (720p): ~2-3 GB per hour
- Full HD (1080p): ~3-5 GB per hour
- 4K channel: ~10-15 GB per hour
- A 32 GB USB drive holds roughly 10 hours of HD content or 3 hours of 4K content
- DRM protection: Some channels have DRM that blocks recording
- Provider restrictions: Some IPTV providers disable recording on their streams
- Device performance: Older or weaker devices may struggle to record while streaming
- File format: Most recordings are saved as TS files, which are large but widely compatible
- EPG dependency: Scheduled recordings require an accurate EPG guide
Recording with IPTV Smarters Pro
IPTV Smarters Pro also includes recording capabilities. The process is similar:
Recording with Kodi
Kodi offers recording through the PVR IPTV Simple Client add-on. For setup instructions, see our VLC and Kodi guide.
Storage Requirements for IPTV Recordings
Recording Size Estimates
Network Storage for Recordings
For extensive recording, use network-attached storage (NAS) or a shared folder on your computer. TiviMate and Kodi support recording to SMB network shares. This lets you record hours of content without worrying about device storage limits. Set up a shared folder on your network and point your IPTV app to that location.
IPTV Recording Limitations
Common Recording Issues and Fixes
Recording Failed or File Is Empty
Check that your storage path is writable and has enough free space. Try recording to a different folder or drive. Ensure your device is not going to sleep during recording — disable power saving settings.
Recordings Are Pixelated or Freezing
This is usually caused by stream instability during recording. Try lowering the stream quality before recording, or ensure your internet connection is stable. For buffering issues, see our buffering fix guide.
Can Not Find Recorded Files
Check the recording folder path in your app settings. On Fire Stick, recordings may be saved to internal storage or an external USB drive. On Android TV, check the Android/data folder for app-specific recording directories.
How to Play Recorded IPTV Files
IPTV recordings are typically saved as TS (MPEG Transport Stream) files. These play in VLC Media Player, Kodi, and most media players. You can also convert them to MP4 using tools like HandBrake or FFmpeg for smaller file sizes and wider compatibility.